~ inspire.create.share. ~ inspire.create.share. ~ inspire.create.share. ~ inspire.create.share. ~ inspire.create.share. ~ inspire.create.share. ~

Monday, December 2, 2019

Holly Jolly Christmas Treat Holder

My Stamp Club ladies are very special, so I made them these darling treat holders from the Holly Jolly Stamp Set and the Night Before Christmas Designer Series Paper.  That paper is just darling!  I made the first one with the reindeer paper, but after I punched the half circle at the top and looked at it, I had decapitated a reindeer!  That was definitely not going to work!  So I chose different paper patterns from that pack of DSP.  There were lots of great options!  This was my finished product all filled with Hershey bars ready to make the ladies smile.  


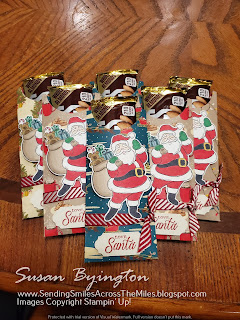
Needless to say, they LOVED them and were so excited about those Hershey bars with almonds.  (I think they all have a bit of a love affair with chocolate.)  Why not?  Most of us love a good chocolate bar.


Here's a close up of just one of the treat holders.  If you would like directions to make your own treat holders, let me know and I will be happy to send them to you.  They are very easy to do and can be customized for any occasion with our gorgeous Designer Series Paper.

Here is the list of supplies I used:

Stamps:  Holly Jolly Christmas (HC p. 26)
Paper:  Whisper White, Night Before Christmas DSP (HC p. 26)
Ink:  Real Red, Memento Tuxedo Black
Tools:  Big Shot, Jolly Season Dies (HC p. 25), Paper Trimmer, 2” Circle Punch, Ribbon Scissors, Ornate Frames Dies (HC p. 53)
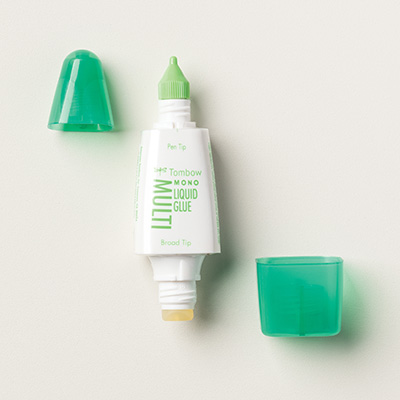
Other:  Liquid Tombow, Dimensionals, Cherry Cobbler 3/8” Diagonal Stripe Ribbon (HC p. 25), Light & Dark Real Red, Light & Dark Pretty Peacock, Light & Dark Call Me Clover, Light & Dark Crumb Cake, Light Basic Black, Ivory, Dark Mango Melody, Light & Dark Soft Suede, Light Flirty Flamingo, Light Smoky Slate, & Color Lifter Stampin’ Blends, Wink of Stella.

All supplies from the Annual Catalog unless otherwise noted.

Sunday, November 10, 2019

BRIGHTLY GLEAMING!

The Brightly Gleaming suite in the Holiday Catalog on page 31 is an absolutely stunning combination of products.  This month the TGIF! Class was all focused on these gorgeous products.  I am so very excited to share these cards with you.

This card was actually a CASE out of the catalog with just a tiny bit of rearranging on my part.  This is a keen reminder that while it's fun to surf the internet looking for project ideas, there are lots of incredible ideas at your fingertips right in your catalog.  While it was excruciatingly painful to put glue on the copper foil side of the DSP, I think the stripes work perfectly for this card.  The Foil Elements added just the right touch of bling at the top to balance out the copper ornamnet and copper stars.  Looking at this photo, I do believe it pops even more in person!  Afer I photographed this card, I decided to add a bit more shimmer to the sentiment and lightly brushed the letters with Wink of Stella.  The difference was subtle but it was just the right amount of extra the card needed.  I also added a "Wink" to the word "jolly" inside the card for a little more glitz!

Please leave me a comment and let me know what you think.

Tuesday, October 8, 2019

Mail Your Cards!

How many of you hoard the cards you make?  I think it's a pretty common occurrence, along with hoarding DSP.  After all, we are so pleased with our work, we hate to let it go.

Well, we just celebrated World Card Making Day on Saturday.  Now I challenge you to have World Card Sending Week!  Send out those beautiful cards you created and make someone smile.  From Oct. 6-12, send as many cards as you can.  Let me know how many you send and I will give a prize of Holiday Rhinestones to the person who sends the most cards.  Be honest now! 

I can't wait to see your results!

Brightly Gleaming Suite


Click here to see all the gorgeous products in the Brightly Gleaming Suite.  This is the Designer Series Paper I used to make the special gifts for my guests at my World Card Making Day Event.  Order your supplies today to make some stunning projects!  Click the link above to see all the products available.  Use the elegant papers, stamps, dies and accessories to make your friends oooh and ahhh over your creations!

Saturday, October 5, 2019

Christmas Box Gifts

Special appreciation gifts for those attending my World Card Making Day Event today!  I just LOVE this Brightly Gleaming Designer Series Paper and it was so much fun making these boxes.

Happy World Card Making Day!

I hope you have some fun getting inky today!  Here are some project suggestions for you to make.

This card features the God's Peace stamp set on page 28 of the Holiday Catalog colored with Stampin' Blends markers.  This is a simple version of the card.  Step it up by stamping the poinsettia on a piece of scrap, cutting it out and attaching it with a Dimensional over the main stamped image.  Want even more pop?  Cover the image stamped on scrap with the Shimmery Crystal Effects (Holiday Catalog p. 41), let it dry and then cut it out and attach with the Dimensional.  

The 'Tis the Season card features the Brightly Gleaming DSP on page 32 in the Holiday Catalog and the Jolly Season Dies on page 25.  The beauty and elegance of the DSP are the focus of this lovely card.

This darling snowman card was made with the Snowman Season stamp set on page 20 of the Holiday Catalog and Itty Bitty Christmas page 16.  Basic Rhinestones and the Ice Stampin' Glitter on page 41 of the Holiday Catalog give this card a wonderful sparkle.  The Frosted Frames Dies (Holiday Catalog p. 41) were used to create the awesome frame around the snowman.

This beautiful scene was created using the Feels Like Frost DSP on page 42 of the Holiday Catalog.  The sleigh dies are made using the Jolly Season Dies on page 25 and popped up with Dimensionals.  This card is simple and does a fabulous job of showcasing gorgeous DSP images.

This card was created using the Free Skate stamp set on page 44 of the Holiday Catalog.  The background DSP is another example of the gorgeous images in the Feels Like Frost DSP (Holiday Catalog p. 42).  The Detailed Skate Dies (Holiday Catalog p. 44) cut out the skates and bow with perfect precision.  One single rhinestone from the Holiday Rhinestone Basic Jewels (Holiday Catalog p. 58) gives a perfect accent.  The sentiment was punched out with the Story Label punch in the Annual Catalog.  

Elegance and beauty is the best way to describe this card that features the Bells are Ringing stamp set (Holiday Catalog p. 17) and the Free Skate stamp set (Holiday Catalog p. 44).  The Detailed Bells Dies on page 17 of the Holiday Catalog give an amazing detail and elegance to the bells.  Mercury Glass Designer Acetate (Holiday Catalog p. 33) gives an incredible beauty and dimension to this card.  

Thursday, October 3, 2019

World Card Making Day This Saturday!


I can't wait to share these amazing cards with you all on World Card Making Day!  Those attending my event (prior registration and payment required) will get to make each of these cards, including some beautiful insides!  If you aren't joining us this Saturday to jump into Christmas, you can view each of the cards here.  I will post them on Saturday morning.

Place an order on Saturday of $50 or more using Host Code DSUAMMCU and you will receive a hand-crafted thank-you card and a package of the new Holiday Rhinestones from me in celebration of World Card Making Day!


Take some time to get messy with paper and ink this World Card Making Day, Saturday, October 5th!


Monday, September 23, 2019

Harvest Hellos Apple Basket


Filled with texture, this card features the Harvest Hellos Stamp Set (#150581) and Apple Builder Punch (#150663).  Purchase them as a bundle (#153037) and save 10%!  You can find them on page 49 of the 2019 Holiday Catalog.

Lots of extra interest and texture was added using the Subtle, Brick & Mortar, and Basket Weave 3D embossing folders.  A few Glue Dots and Dimensionals makes everything sort of pop right off the card!  Don't you want to just reach out and grab one of those apples?

My card was CASED from one of Cindy Brumbaugh's creations and you can see her original card here.  I made a few adjustments when creating my card, but that's how stampers create so many wonderful versions of a similar card!  Sharing creativity is what it's all about.

To purchase supplies to make this card, visit my online store HERE.

Monday, September 16, 2019

Floral Essence


The flowers here just seem to want to pop right off that paper!  All the images in this pack of Designer Series Paper are so soft and beautiful!  You get 24 12x12 sheets in this pack and they are all lighter weight for easier layering.

This card features the Floral Essence stamp set (#149450), Perennial Flower Punch (#149522), Here's A Card stamp set (#149438), Leaf Punch (#144667) and that stunning Pressed Petals Designer Series Paper (#149500).  I added a bit of the new Rococo Rose Scalloped Linen Ribbon (#149704) for a soft touch.

Visit my online store at www.SmilesAcrossTheMiles.stampinup.net to purchase supplies to make this card at home.

Please leave me a comment and let me know what you think!

Sunday, September 15, 2019

Floating Frame Cards


We made these gorgeous cards at a class in April using the Floating Frame technique.  With this technique you get two for one!  After stamping and coloring your flowers, they are die cut and placed on your cardstock close together, completely covering it.  (Dry the ink with a Heat Tool to set it and prevent it from sticking too tightly to the plastic wrap and peeling off.)  Press a piece of Press 'N Seal plastic wrap firmly over the flowers, especially in between the images.  Run through die cutting machine to cut out desired shape in the center.  Cut off any flowers that hang over the edge of the cardstock and carefully peel off the cardstock.  Generously place Dimensionals on the flowers and leaves.  Adhere to card front and gently peel off the plastic wrap.  Stamp sentiment in the opening.

Use the center portion that you cut out to create a second card with a sweet frame around it!  Two for one! 

I used the retired Petal Palette and Petals & More Thinlits for the flowers on this card, but you can use any floral images that you can group together.  The sentiments used are from Strong and Beautiful (#148732) an Itty Bitty Birthdays (#148618).  Choose your favorite Stampin' Blends marker colors to create the look you desire.

Thanks to Jennifer McGuire for her inspiration to create these beautiful cards!

Friday, September 13, 2019

Happy Birthday!

Wishing a happy birthday to my son, Adam, today!

To create this card I used the Brick & Mortar 3D embossing folder and the lovely Gathered Leaves Dies.  The sentiment is from a retired set.  I keep all those great birthday greetings to mix and match images so my birthday cards are always fresh and new!  Do you keep your birthday sets from years past?


TGIF! Class


Looking forward to a fun evening tonight at the TGIF! Class.

Thursday, September 12, 2019

Back On Your Feet

This fun center pop-up card was made using the Back On Your Feet stamp set (#149385) from the 2019-2020 Stampin' Up! Annual Catalog.  The Designer Series Paper is called Garden Lane (#149488).  I had so much fun with this poor little turtle stuck on his back!  This was one of the cards we made in class last month.

All the images in this cute set are absolutely perfect for sending a sweet "thinking of you" note.


Back on Your Feet Stamp Set


BACK ON YOUR FEET CLING STAMP SET

Thursday, August 22, 2019

Embossed Wedding Card

Here is the full image of the lovely wedding card we made in class this month!  I love how soft and sweet it is, with a little vintage feel.

To create this card, I used the Woven Heirlooms Bundle and the Tin Tile 3-D Embossing Folder.  When you order the Woven Heirlooms Bundle, you get the stamp set, embossing folders and dies!  I also used some dies from the Butterfly Beauty and Bouquet Bunch dies for a sweet finishing touch.

If you couldn't make it to class this month but would like specific directions to make this lovely card, I will send you a FREE tutorial with any $50 online order.  Please use Host Code Q9ZRBPSX when ordering.

**I CASED the basic idea for this card from a pin I found, but the original creater's name was not on it.  If this is your creation, please let me know so I can give you credit.

Click the description below the images to go to my online store to order your supplies to make this beautiful card.

WOVEN HEIRLOOMS BUNDLE
Price: $47.50

Thursday, August 8, 2019

Embossed Wedding Card

Here's a little peek at one of the cards we are making in class this month!  It features the Woven Heirlooms stamp set with coordinating dies and embossing folders.  It also features another 3D emobssing folder called Tin Tile.  If you would like to join us for class in O'Fallon tomorrow, August 8th, at 6:30 or in Union, Missouri, on August 20th, contact me today.  I am getting ready to cut cardstock and prepare supplies now.


Wednesday, June 5, 2019

2019-2020 Annual Catalog LIVE!


The new 2019-2020 Annual Stampin' Up! Catalog is now LIVE!   Click HERE to see all the fabulous new products!  Ready to order?  Click HERE to go to my online store!  Place a $50 order using Host Code CVNAGMZ4 by June 10th and I will give you a FREE catalog.  If you already purchased a catalog from me and place a $50 order, I will credit your next order placed directly through me $5.  

Friday, May 24, 2019

Best Catch

I LOVE, LOVE, LOVE this stamp bundle of Best Catch stamp set and Catch of the Day Thinlits Dies!!!  Combined with the Crackle Paint background stamp and some distressing of the cardstock, you get a perfect card for a man.  We made this card at classes this May as we focused on masculine themes.  I CASED my design (with a few changes here and there) from Tracy Gray.  You can see her original card HERE.  I felt so artistic and creative working on this card.  It's a perfect Father's Day card for my dad!
Now I have to tell you, it looks much better in person.  This photo sort of washed out the contrasts in the card and the bright colors in the fish.  The dies from Garage Gears Thinlits were used for the sentiment and Stampin' Blends colored the fish, hat, and basket.  The cattails seemed a little flat, and after trying several options, I decided to cut them out of Crumb Cake cardstock, then run it through the Subtles Embossing Folder.  Adhering it to a second die cut of the cattails then gave it a little strength.  Using my Bone Folder, I smoothed out some of the ridges made by the embossing folder, so it was even more subtle.  Random sponging of Soft Suede ink all over and Early Espresso around the edges made it pop, giving me the light and shadow effect I wanted.  I colored the cattails with Dark Soft Suede and Dark Crumb Cake markers for the tops and stems.

The fish was colored to represent a rainbow trout with more Stampin' Blends, then covered with Clear Wink of Stella for the perfect finish.  The die cuts out the fins also so they pop up off the fish body.  Adhering the images with Dimensionals and Glue Dots gave the card depth and added interest.

The Crumb Cake layer was stamped, then distressed using my Bone Folder, repeatedly bending the cardstock (like curling a ribbon) until the edges began to separate.  I pulled slightly on all four edges and added Early Espresso ink around all the edges to create more depth.   

If you love this combo as much as I do, be sure to order your bundle today, because it won't be offered as a bundle in the new catalog.  Ordering it now saves you 10% with the bundle price!  Click HERE to order your Best Catch Bundle.  Simply click Shop Now and use the Host Code shown on the intro page.  Everyone who uses this code will have their name entered into a drawing for a FREE GIFT.  Good luck!

Thursday, May 23, 2019

New Catalog Open House!


Register for my New Catalog Open House Event!

The event takes place on Saturday, June 8th, from 11 a.m. - 4 p.m.
Come see the new catalog and products.
The day will be filled with games, prizes, make & takes, food, Bingo! and more!!!
Discounted retired product for sale--cash & carry only.  Gift bags for everyone who registers.
This is a FREE EVENT!
Don't miss this once-a-year opportunity!  Register now and share it with your friends!
Seriously, this is the most amazing
event of the year!!!
Click HERE to register now.
 

Grad Cards

Here are a couple great graduation cards I made for this past weekend that I would like to share with you. 
 This elegant card was made using the Layering Alphabet Edgelits combined with Gold Foil Paper, Night of Navy and Thick Whisper White cardstock.  I also used the Stitched Rectangle Dies for a little extra detail.  I used Itty Bitty Birthdays for the sentiment popped up with Dimensionals.  I love the elegant look this combination created with the layers of the Night of Navy made with the Layering Alphabet Edgelits!  You may have to enlarge it on your screen to see the detail.


This second card creates a fun, whimsical mood using the retired Alphabet Embossing Folder, and two retired stamp sets:  Bravo and Gorgeous Grunge.  It's easy to create this card using any school colors.  For this card, I simply inked the embossing folder with Night of Navy ink and ran it through the Big Shot with Whisper White cardstock.  Then in random patterns I sponged Balmy Blue, Night of Navy and retired Island Indigo ink over the raised letters.  Embossing the "tire tracks" from Gorgeous Grunge at various angles using retired Pewter Embossing Powder gave it a graffiti feel.  I felt it needed a little more shimmer so I inked up the splatter stamp from Gorgeous Grunge with Champagne Mist and Frost White Shimmer Paint.  Then I continued that shimmer on the inside around the "Congratulations" stamped in Night of Navy. 

Which one is your favorite?

Wednesday, May 8, 2019

Beauty Abounds Birthday

Here's a quick birthday card made with Beauty Abounds and Birthday Cheer stamp sets. I love how it turned out! One has a black mat behind the stamped layer. I edged the black mat with a Clear Wink of Stella brush to make it shimmer a bit. The other one has a Gold Foil mat behind the stamped layer for a little more pop.  Both versions have a little bling added with Basic Rhinestones.

Which one do you like better?


Tuesday, May 7, 2019

Floating Frame Cards

These are Floating Frame cards and were done at my April class. All the images are colored and placed on the first card base with Dimensionals, then the center frame is cut out. The section that is cut out forms the center of card #2 with a little frame added for interest. There is a little more involved to set up the first card requiring the use of Glad Press 'n' Seal and another layer of cardstock that we learned in class. I used Petal Palette stamp set for the flowers. Strong & Beautiful and Itty Bitty Birthdays were used for the sentiments. Do you have a favorite?

Tuesday, April 9, 2019

Retiring Products and New Opportunities

Stampin' Up! will be retiring their current Stampin' Trimmer & accessories, along with the Big Shot & accessories on June 3, 2019.  Be sure to place orders now for replacement cutting blades or other accessories you may need before they are sold out. New and improved products to replace these are being developed and will be available as soon as they are ready, but it could be a while, so please be patient. Your existing die cutting and embossing tools will continue to work in the new die cutting machine. These changes open the door to innovation and creativity! I can't wait to see the future!

Request my newsletter for more detailed information.

Wednesday, March 27, 2019

Lily Sympathy Card

Here is a lovely sympathy card I made using the Lasting Lily stamp set and Lily Framelits.  The Lasting Lily stamp set is from the current Sale-A-Bration catalog that ends March 31st.  The Lily Framelits Dies are a special offer coordinating item only available during march.  Unfortunately, they are completely sold out.  I did want to share this beautiful card with you, though.  You could, of course, fussy cut out the images.  Putting forth a little extra effort on sympathy cards is often something we want to do for that special person who is receiving it.

Adding a few extra touches of shading gives this card a very realistic look.  The stamps themselves are part of the DistInktive line which makes images look quite photo realistic in the first place.  Coloring in the visible part of the stamen with a Daffodil Delight Stampin' Blends Marker adds just the touch the flower needs.  You can color right over the stamped image and the look is perfect!