~ inspire.create.share. ~ inspire.create.share. ~ inspire.create.share. ~ inspire.create.share. ~ inspire.create.share. ~ inspire.create.share. ~

Friday, December 25, 2015

Merry Christmas!

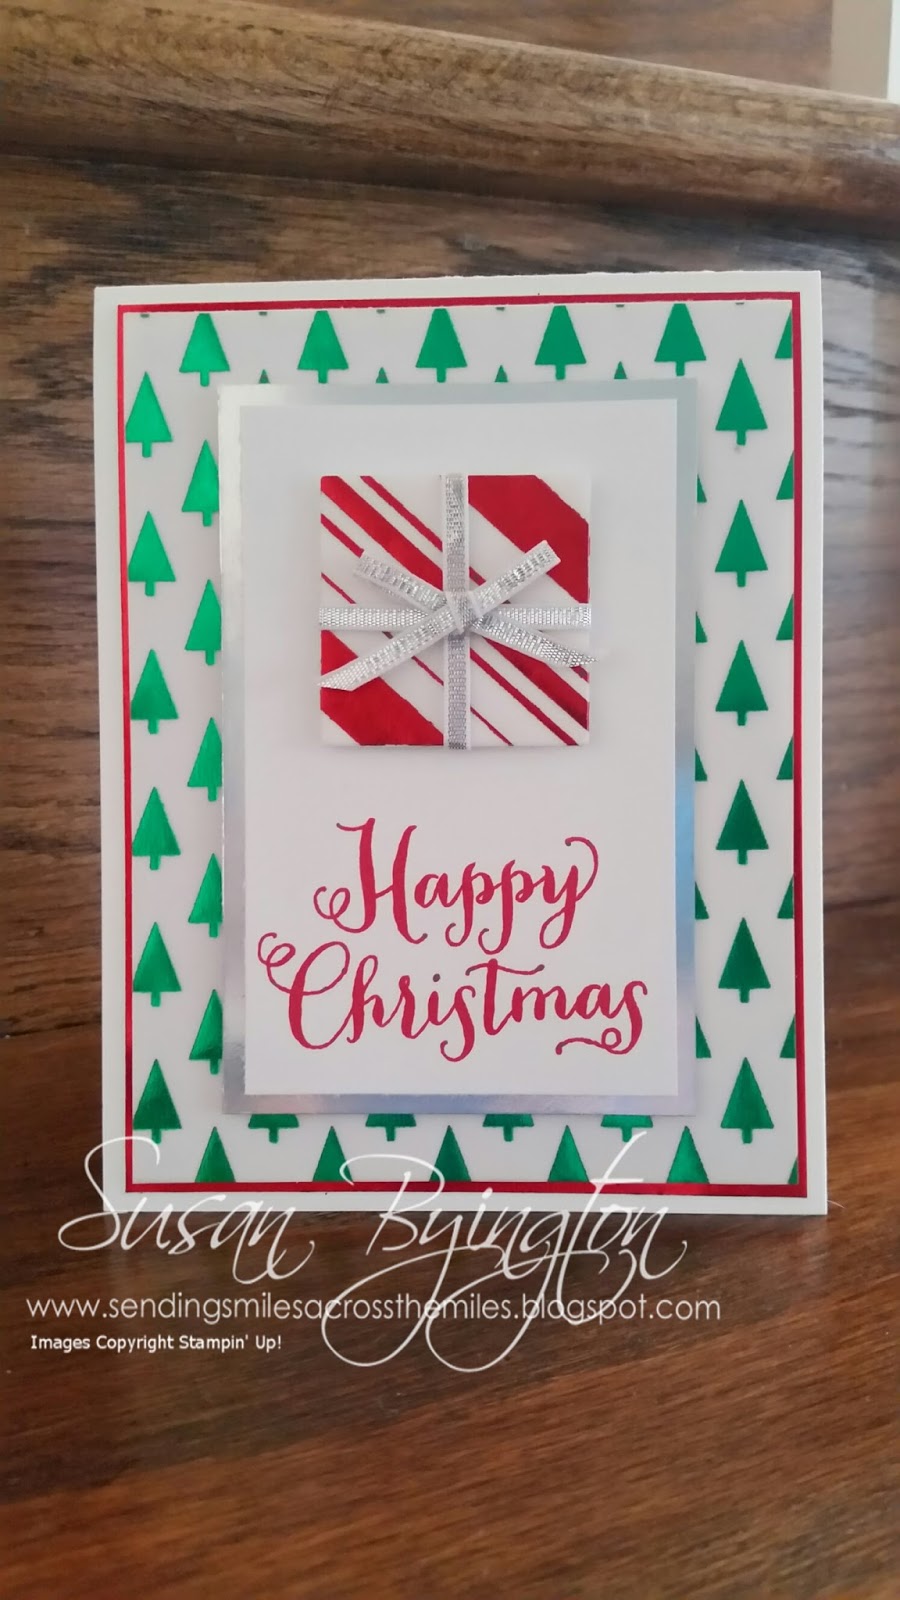
Merry Christmas to all!
Enjoy the time with your family and remember the true reason for the season--to celebrate the birth of our Savior!  Giving gifts is a wonderful way to remember the greatest gift of all:  That tiny baby in a manger so very long ago who came to pay the price for all our sins that we may have eternal life.

Here is one more Christmas card to share with you.  This blissful winter scene is done in all neutrals with a tiny smattering of silver glitter icing the trees.  It absolutely takes my breath away!  The very delicate snowflake is from the Snowflake Elements (I added a bit of Dazzling Diamonds Glitter to it so it would have an iridescent quality) and the stamp set is Wonderland.  This is definitely a hand-deliver card, as the snowflake is much too fragile to mail.  I did hand-deliver quite of few of these cards to special friends and family.

I have taken a second photo close up to show you some of the lovely detail that really isn't visible in the first photo.  Please leave comments to let me know what you think of this card.


Wednesday, December 23, 2015

More Christmas Projects

I have lots of projects to share with you, but all the Christmas preparations have overwhelmed me (again).  I say I will get it all together every year and then it sneaks up on me and I go round in circles.  Well here are some more of the projects I have made.  While it may be a bit late to make any of these this year, you can always save an idea for next year.  Enjoy!

Off to make a set of cards for a gift, bake some pumpkin bread, and make a pot of chili!


Tuesday, December 22, 2015

Oh What Fun with Fancy Foil!

Here is a lovely card that is easy to make but shimmers with holiday color.  I used the Holidays Fancy Foil Designer Vellum layered over Whisper White card stock, alternating with layers of Red Foil and Silver Foil Paper.  A bit of 1/8" Silver Ribbon ties off the package just perfectly!  I found the inspiration for this card from Jari Francis here.  You can see I added a few touches of red to spice things up a bit.  I just love shimmery red on Christmas cards!  The sentiment is from the Oh What Fun stamp set.


I had so much fun with this look that I made tags to coordinate.  One of my very favorite new sets is the Peaceful Pines stamp set with matching Perfect Pines Framelits!  Oh the possibilities with this combination are endless!!  This is one set I made.  Note the Red Foil "lights" peeking out of the tree branches.  This is done with one of the included dies to poke holes in your tree so the light can shine through!  The Scalloped Tag Topper Punch was used on the long tag and the Lots of Labels Framelits were used for the smaller one.

Please leave me a comment and let me know what you think of my creations.


Wednesday, December 16, 2015

Christmas Event and Woodland Embossing Folder

Hello again!  I know that I have been lax in getting my posts up for you lately because I am elbow deep in card stock, glitter and adhesive!  In between paper projects, I am baking a few cookies.  I hope to finish cards and make tags tonight so I can wrap gifts.

Here is a picture of a few of the ladies who attended the annual Christmas Boxes, Bags & Tags Event on December 5th.  We had an excellent time and everyone made 14 projects to take home.  After stamping for 5 hours, we shared a potluck meal of holiday favorites.  I look forward to that event every year!

Mary showing Loki how to make the project as he listens intently.

Christmas fun with boxes, bags & tags.

Below is a picture of one of the Christmas cards I sent out this year.  I had so many great designs that I made several different cards this year instead of them all being the same.  I hope to get more Christmas cards and projects posted here for you to see.  The biggest issue is getting them photographed and then moved into a file so I can post them.  I'm not very efficient at that.


This card used the ever-so-popular Woodland Embossing Folder and Wonderland stamp set.  Amazing what a little ink, embossing folder and glitter can produce!  The photograph really does not do justice to this stunning card.  The entire card shimmers with little bits of glitter in all the trees and glittery piles of melting snow dripping off some of the embossed tree branches.  The Fine Tip Glue Pen is great for creating this effect with Dazzling Diamonds Glitter.  The word "Peace" was made using the Christmas Greetings Thinlits Dies and Silver Foil Paper.  The shadow behind the silver "Peace" is Mossy Meadow card stock.  What do you think?

Thursday, December 10, 2015

Year-End Clearance Sale Up to 60% off!!

It's the end of the year, so Stampin' Up! is cleaning up inventory and making room for new products--and they're offering you some great savings while they do it!  More products have been added to the Clearance Rack and select items from the holiday catalog have been discounted.  (Products on the Holiday Retiring List  are now discounted up to 40%!!)  During the Year-End Sale, you can find ALL discounted products in one location in the online store under the Year-End Sale category.  So don't panic if you don't see the category "Clearance Rack" in my online store right now--it has been integrated into the Year-End Sale.  Click HERE to begin shopping now!  Use Host Code 44SJB2G3 when shopping for even more great benefits!

New Year Mystery Hostess
You can win lots of FREE products just by placing an order between now and December 31st.  Everyone who uses Host Code 44SJB2G3 with an order of $20 or more will have their name entered into a drawing to be the Mystery Hostess.  I will contact the winner just after the new year to select her FREE products!  That's it!  You don't have to do anything else.  When you have finished shopping, click "view shopping bag" and you will see a box in the lower left corner for a host code.  Paste Code 44SJB2G3 in the box and click "apply" and your name will be entered into the drawing to be the New Year Mystery Hostess.  What a great way to start 2016!  Orders must be at least $20 and you must choose to allow Demonstrator contact or I won't know who you are to enter your name in the drawing.  If your order is $150 or more, you will earn FREE Stampin' Rewards immediately if you do not use the host code.

Good luck and enjoy the bargains!

Polar Bear Punch Art

Hello!  I'm so sorry I have been a bit lax about getting my posts up.  With preparing for Thanksgiving and my Stamp Club Christmas Event, I got a bit overwhelmed.  A weekend trip to Branson, Missouri, for some Christmas shows and shopping capped off Thanksgiving weekend for me.  Returning home, I was full swing into Christmas decorating and finishing preparing for the Holiday Boxes, Bags & Tags Event here on December 5th.  The day was filled with a variety of projects (14 to be exact) to make your holidays bright and festive.  After 5 hours of stamping, we shared a pot-luck meal of holiday favorites.  It was delicious!  Following that event, I was very focused on making my own personal Christmas cards and projects.

Unfortunately, I didn't have all the great holiday items photographed to show you and every day seemed to fly by so quickly.  Soooo, I didn't get my posts up on time.  So Sorry!

Here is one of the lovely cards I have been working on to send out for Christmas.  This is a sweet punch art card using Winter Wonderland Specialty Designer Series Paper as the background for my cute little polar bear family.  Some torn edges, a little sponging and a touch of Dazzling Diamonds Glitter adhered with the Fine Tip Glue Pen makes my card sparkle.  I like the Fine Tip Glue Pen for details like this because I can get a nice thick line of glue or spread it out and have just a touch.

The sentiment is from the Wonderland stamp set.  Isn't it amazing what some circle and oval punches can create?

Please leave me a comment and let me know what you think of my little polar bear family.

The response I have been receiving from my polar bear card is incredible!  Here are the much requested directions for making this card.  I hope they are helpful!

POLAR BEARS

STAMP:  Wonderland
PAPER:  Whisper White, Basic Black, Winter Wonderland DSP
INK:  Soft Sky, Smoky Slate

TOOLS:  Punches – Word Window, Owl, 1” Circle, 1 ¾” Circle, 1 ¼” Circle, ½” Circle, Stamp-A-Ma-Jig

Mama Bear Head & Body – 1 ¾” Circle X 2
Baby Head – 1” Circle X2
Baby Body – 1 ¼” Circle X1
Mama Ears – ½” Circle X2
Baby Ears – Large circle from Owl Punch X4
Eyes – Smallest circles from Owl Punch X6
*Mama Nose – Large Oval cropped with 1” Circle X1
*Baby Nose – Word Window cropped with Word Window X2
Mama Nose Tip – Largest circle from Owl Punch X1
Baby Nose Tip – Medium circle from Owl Punch X2

*Crop noses attaching a scrap of paper to the punched shape and sliding it into the punch.  For mama bear, crop with 1” Circle.  For baby bears, crop with Word Window Punch.

OTHER:  Fine Tip Glue Pen, Dazzling Diamonds Glitter, Dimensionals, White Gel Pen, Sponges, Sponge Daubers
  
DIRECTIONS:
Sponge all bear parts LIGHTLY with Smoky Slate
Mark eyes with pencil and glue on smallest black circles with Fine Tip Glue Pen
Glue on nose and ears
Highlight nose tip with White Gel Pen

Adhere DSP to top half of card front.

Tear Whisper White CS to make ragged edge.  Use both pieces to create look of snow drifts.  Trim bottom to fit.  LIGHTLY sponge edges with Soft Sky, including sides and bottom, and add glitter to edges using Fine Tip Glue Pen.

Stamp sentiment on smaller piece of Whisper White CS snow drift in bottom right corner.

DO NOT PUT GLUE UNDER TOP EDGE OF LARGE SNOW DRIFT.  Glue larger piece of snow drift to base putting glue at bottom and slightly up outer edges leaving room at the top for the bear bodies to slide underneath. 

Glue smaller piece of snow drift over first piece at the bottom of card front.

Place Dimensionals under mama bear’s ears and nose.  POSITION MAMA BEAR FIRST.  Slide her body in behind her head under the edge of the torn snow drift before attaching head with Dimensionals.

Attach 1 Dimensional to each baby bear head – One bear on right side of head and one bear on left side of head.  THE DIMENSIONAL ATTACHES TO THE SNOW DRIFT, NOT MAMA BEAR’S FACE.  Angle baby bear heads in slightly.  Attach baby bear heads to card front overlapping mama bear’s face. 

Slide right baby bear’s body in behind his head and under the edge of the torn snow drift.


Tuesday, December 1, 2015

Gingerbread Punch Art

This cute card was one of the projects we made at the Punch Art Class.  I got the original idea from a card Jackie Topa posted back in 2013.  You can see her original card here.  Putting my own spin on it and using current DSP, I love how it turned out!  What do you think?

The gingerbread bodies were made using the Pansy Punch and the 3/4" Circle Punch.  The Cookies were made with the 1/2" Circle Punch.  The rolling pin is the Word Window Punch and thin strips of Cherry Cobbler card stock.  Details added with sponging and a White Gel Pen make all the difference.  The sweet little buttons are the Home For Christmas Enamel Dots.  Of course, some carefully placed Dimensionals under the rolling pin and gingerbread kids are essential here as well.

The Designer Series Paper is from Season of Cheer and the sentiments are from the Oh What Fun stamp set.  Please leave me a comment!


Thursday, November 26, 2015

Happy Thanksgiving

Happy Thanksgiving to you!  Please take some time today to reflect on all the blessings you have received and the people who love you.  Here are my table decorations ready to set out on the tables.

Let our lives be full of both THANKS and GIVING!


Wednesday, November 25, 2015

Autumn Wishes

Here is a quick and simple card made with the Woodland Textured Impressions Embossing Folder and Among the Branches stamp set.  This is a lovely fall card to send for any occasion.  I also used the Gold Glitter Ribbon as an accent.


Monday, November 23, 2015

ONLINE EXTRAVAGANZA!


The Stampin' Up! Online Extravaganza begins Monday at 12:00 a.m. mountain time.  There are special Flash Sale deals on Monday, November 23, and Monday November 30.  All the other items listed are available at these prices from November 23 - November 30.  You may also include regular catalog items, Clearance Rack items, or Holiday Catalog items on your order.  If you want to see the Holiday Catalog Retiring List while shopping on my website, click the red box that says "See What's Retiring."  Please use Host Code 9FKD42AP when checking out.  Everyone who uses this code will have their name entered into a drawing for a FREE gift.  When you have finished shopping, click on "view shopping bag" and you will see a box in the lower left corner for a code.  Paste 9FKD42AP in the box and click "apply."  Then I will enter your name into the drawing.  If you order multiple times, your name will be entered in the drawing each time you order.  Be sure to choose "allow Demonstrator Contact" when you are checking out or I will not know who you are to enter your name into the drawing!  If you are a Stamp Club member and prefer not to have your name in the drawing, but would rather have your order credited to the December hostess, contact me for your special code.  

If your order is $150 or more, do not use the code and you will receive FREE Stampin' Rewards for yourself.

Select Past Paper Pumpkin kits are available on the Online Extravaganza to both subscribers and non-subscribers.

If you are ordering bundles, you must use the bundle number provided on the Online Extravaganza list in order to receive the discounts.  If you enter the regular catalog item numbers, you will not get the discount.  These bundles will only be available for the Online Extravaganza.  They will not be available after November 30.

When you are ready to shop go directly to my online store at www.SmilesAcrossTheMiles.stampinup.net.  

Enjoy the bargains!  

Thursday, November 19, 2015

Vintage Leaves Again

This stunning card was CASED from Michelle Zindorf.  I simply fell in love with the rich tones created when you combine Delightful Dijon and Cajun Craze!  Add in a touch of Basic Black and Mossy Meadow with Gold Embossing Powder and you really have some impact!  My stamp sets used here are Gorgeous Grunge and Vintage Leaves. The Mossy Meadow leaves were cut out with the Leaflets Framelits.  The sentiment is from Lighthearted Leaves.  The black tuxedo bow on the front is made with the Bow Builder Punch.  A little Versamark applied to the edges with a Blender Pen and some Gold Embossing Powder give it a little extra class.

I think square cards are extra special any way.  This one looks extremely rich and elegant!  Thanks for the inspiration, Michelle!  What do you think?  Please leave me a comment!


Monday, November 16, 2015

2015 Holiday Catalog Items Retiring

Click here to shop now.

A list of items that are retiring from the 2015 Holiday Catalog is now available.  Click HERE to view the retiring list.  Check your wish lists and be sure to order your favorites before they are gone for good!  Stamp sets will be available until a week or so before the end of the catalog period on January 4th, but some other items that have to be ordered from overseas may run out sooner, due to the lead time required to order and receive the items in the Stampin' Up! Warehouse.  So don't delay, place an order today for all the Holiday items still on your wish list!  Please use Host Code FJ3363RN when shopping and I will enter your name into a drawing for a FREE gift.  If your order is $150 or more, don't use the code and you will qualify for FREE Stampin' Rewards.

Thursday, November 12, 2015

Vintage Leaves and Lighthearted Leaves Together

More leaves!  Today's card shows images from the Vintage Leaves stamp set combined with a sentiment from the Lighthearted Leaves stamp set.  Aren't those leaves just so beautiful?  I used Kraft cardstock as the second layer of the card and trimmed the edges to match the die cut of the sentiment.  That die came from the Square Pillow Box Thinlits Die.  There are so many things you can do with those Square Pillow Box Thinlits!  I just love it!  The ribbon is a cut edge of the Burlap Ribbon that I frayed at the edges for a softer look.  I used some Soft Suede ink to sponge a little softness all over the Kraft cardstock. 

This card is also a favorite of mine this fall.  I think the colors are just so soothing together.  I would love to hear your comments.


Tuesday, November 10, 2015

Lighthearted Leaves

I love leaves and especially love all the colors of leaves in the fall.  This card adds a touch of shimmery gold that was made using the Happy Patterns Decorative Masks.  I simply used Versamark ink on a Sponge Dauber to ink up the cardstock through the mask, then sprinkled Gold Embossing Powder after removing the mask.  What a cool background it makes!  The rest of the card is so simple and basic.  Stamping the leaves from the Lighthearted Leaves stamp set and cutting them out with the matching Leaflets Framelits made a nice accent for the card.  The sentiment also comes from the Lighthearted Leaves stamp set and is definitely one of my favorites this year!  I used the Deco Labels Framelits to cut out the sentiment.  I softened the color of the Mossy Meadow Striped Cotton Ribbon by sponging a little Delightful Dijon ink on it before wrapping it around the Cajun Craze cardstock and adhering it to the back.  Taking another piece of the same ribbon, I pulled the threads from the green stripe apart to get 3 fine pieces to tie around the center leaf.  I think the final result is a lovely fall card to send for Thanksgiving.

What do you think?  Please leave me a comment.


Thursday, November 5, 2015

Embellished Ornaments

This is a lovely card that is crisp and bold with its traditional Christmas colors.  I used the Embellished Ornaments stamp set and the matching Delicate Ornament Thinlits Dies with Whisper White Thick Cardstock as the base.  This cardstock is so fabulous when you want a simple white card base!  It holds up very nicely and the ink does not show through the other side--not even this bold Real Red.  The finish on this paper produces a beautifully stamped image as well.  A few dabs of glue from the Fine Tip Glue Pen and some Silver Glitter make the ornament sparkle.  A Silver Foil top and Silver Cording Trim top it off.  Using a Blender Pen, I lightly colored in the leaves that were lined up using the Stamp-A-Ma-Jig.  The berries are Red Glimmer Paper pieces that I made with the 1/8" Hole Punch and glued on with a tiny dot from the Fine Tip Glue Pen.  I popped the ornament up with Dimensionals.

Traditional and bold!  What do you think?


Monday, November 2, 2015

Vintage Leaves Grateful

This is a quick card to make but the lovely leaves and DSP give it a lot of impact.  The DSP is part of the Into the Woods Designer Series Paper and the leaves are stamped using the Vintage Leaves stamp set and cut out with the matching Leaflets Framelits.  Both the Vintage Leaves stamp set and the framelits can be found in the 2015-2016 Annual Catalog.  I am a huge fan of anything with leaves!  I think they exude a wonderful quality that can be fun and lighthearted or soft and subtle.  Often some of the best masculine cards are made with leaves.  It just seems to work well for men--get away from the many varieties of flowers we so love to use.

For the sentiment I used A Little Something stamp set found in the 2015 Holiday Catalog cut out with the Lots of Labels Framelits from the Annual Catalog. This set has so many cute little images that work perfectly on cards like this where the paper really is the focal point.  They also make great tags for boxes and bags, including the Square Pillow Box Thinlits Die.  You can bundle the stamp set and the dies together for an even better bargain and get 15% off!

Take a few minutes and look through all the beautiful designer series paper Stampin' Up! has to offer.  Keep in mind that the catalog really doesn't do the patterns justice.  Pick a paper you love and create a card with it!


Friday, October 30, 2015

Square Pillow Box Halloween Teats

TRICK OR TREAT!!


Oh what fun!  Halloween treats in cute little boxes made with the Square Pillow Box Die in the 2015 Holiday Catalog.  They go together in a snap and can be closed as shown or leave the top open for a totally different look as shown in this post from October 5th.  The Designer Series Paper is from the Happy Haunting package, and the sentiment comes from A Little Something stamp set.  By the way, you can get the Square Pillow Box Die and A Little Something stamp set as a bundle and save 15%!  Those cute little pumpkin cut outs come from the Square Pillow Box Thinlits Dies and so does the modified square shape showcasing the sentiments and the peek-through window on the black box.  Pumpkin Pie 1/4" Cotton Ribbon and 3/8" Basic Black Stitched Satin Ribbon decorate each package.  The hanging pumpkins are attached with Basic Black Baker's Twine.

You have just enough time to make a couple of these sweet treat boxes for your special trick or treaters!


Thursday, October 29, 2015

Hearth and Home Spooky Window

What a fun Halloween card!  Here I used the Hearth and Home Thinlits Dies for this cute window frame and Window Sheets to give it a realistic glass look.  The ghosts peeking in the window are from the Happy Haunting Designer Series Paper.  The Spooky sentiment comes from Among the Branches, and those darling pumpkins are little dies included in the Square Pillow Box Thinlits Dies!  A touch of Gold Glitter applied with the Fine Tip Glue Pen on the background DSP (Happy Haunting) gives it a sparkly finish.

Dimensionals are essential in assembling this window!  I really used a lot of them, but am so very pleased with the effect.  What do you think?  Please leave me a comment below!


Monday, October 26, 2015

Woodland Embossing Folder Scene

I just can't get enough of the Woodland Embossing Folder!  This is a stunning card with lots of impact, but very easy to make.  The Cherry Cobbler cardstock peeking out at the top and bottom of the frosty forest scene just makes it pop!  I ran the Smoky Slate cardstock through the Woodland Embossing Folder, then used a sponge dauber dipped in Versamark ink to cover the raised tree trunks.  I used a Blender Pen dipped in the Versamark to do the thin little branches.  Then I embossed it with Iridescent Ice Embossing Powder.  A few dabs of glue from the Fine Tip Glue Pen and some Dazzling Diamonds Glitter created snow on some of the branches.  The Real Red ornaments are from Among the Branches and the simple sentiment is from the Wonderland stamp set.


Thursday, October 22, 2015

Delicate Ornament Thinlits Dies

This simple card was made using the new Delicate Ornament Thinlits dies.  This is the smallest ornament in the set, die cut out of Gold Foil Paper.  The strip on the side is also Gold Foil Paper embossed with the Elegant Dots Embossing Folder.  The background ornaments are from the Home For Christmas Designer Series Paper.  The rich colors in those ornaments just make it pop off the page.  Sadly, the picture really doesn't do it justice.  You just have to see all these papers in person to appreciate how fabulous they really are!  I wasn't terribly impressed by them from the picture in the catalog until I saw them in person.  Then, of course, I HAD to have them!  All of the Designer Series Papers are like that.  You just can't tell from a photo how beautiful they really are.  I especially love the papers from Stampin' Up! because the quality is so excellent, the colors so vibrant, and you have two sides to choose from!  However, that can be a problem when you want to use both sides!  :P

The simple sentiment is from Versatile Christmas and punched out with the Word Window Punch.  A tiny hole made with the 1/16" Circle Hole Punch works perfectly for the Gold Cording Trim to tie it on to the opening at the top of the ornament.

Please leave me a comment!


Monday, October 19, 2015

Winter Wonderland Mini Treat Bag

This is the birthday gift I made for my son.  He wanted arrows for his crossbow and I really didn't know what to get, so I decided to just give him some cash and he could choose what he wanted.  Well, now I had to think of a nice way to present the cash!  Then I saw a sample of a Mini Treat Bag made with the Antler Paper from the Winter Wonderland Designer Series Paper.  Bingo!  What a perfect presentation for a deer hunter!  So I got busy playing with the Mini Treat Bag Thinlits and the DSP and this is my finished product.  I am really pleased with how it turned out.

I really like the effect you get with the Corrugated Paper found on Page 148 of the Annual Catalog.  It is kind of lost there, so be sure to check it out, along with all the other unique paper offerings on Pages 148-149.

The ribbon is Early Espresso Seam Binding and the Black Baker's Twine is left over from last year's Halloween Paper Pumpkin.  The cute little "for you" is a die that comes with the Mini Treat Bag Thinlit, as well as the flagged-end piece under the oval center.  Of course, I used the Ovals Framelits Dies to highlight the die cut sentiment that I sponged with Soft Suede ink for extra effect.  Inside I just created a little pouch from the Corrugated Paper to hold the money and tied it shut.  I cut the edges with the retired Angled Tag Topper Punch.  The simple Happy Birthday comes from the Guy Greetings stamp set.  A little ink sponging on the Corrugated Paper adds depth and interest to the project.

It's a perfect simple and masculine presentation for cash or a gift card.  Please leave me a comment and let me know how you like it!


Sunday, October 18, 2015

SALE! 15% OFF STAMP SETS!

SURPRISE!

From October 19th - 23rd all stamps in the Annual Catalog and the Holiday Catalog are 15% off!  The bundles are excluded from the sale because they are already 15% off.

What a great surprise deal just in time for you to get all your supplies for the holidays!  So get out that wish list and order those stamp sets you have been drooling over, but just kept bumping off the list for something else you needed more urgently.  Now is the time!

Place an online order using Host Code MJB3GSJ6 and your name will automatically be entered into a drawing for a FREE gift.  This code will only be available until October 23rd!  Click HERE to be directed to my online store.  When you have finished shopping, click "view shopping bag" and you will see a box in the lower left corner for a Host Code.  Paste MJB3GSJ6 in the box and click "apply."  That's all there is to it!  Remember, for every $50 increment in merchandise (before tax and shipping), you will receive a Smiley in my Rewards Program.  Collect 10 Smileys and I will buy you any current stamp set you wish!  Contact me for details or for a tracking sheet if you don't have one.  

Thursday, October 15, 2015

Haunt Ya Later

Look at this adorable little boy decked out for Halloween as a vampire!  The stamp set is Haunt Ya Later (p. 48 Holiday Catalog)  and the Designer Series Paper piece is from Happy Haunting (p. 47 Holiday Catalog).  A Spider Web Doily  (p. 47 Holiday Catalog) is the creative touch added to this card.  Unfortunately, these Spider Web Doilies have been soooo popular, they are on backorder and if you don't already have your order in for these, you won't receive them in time for Halloween this year; but you could use them next year!  Another great use is to cut out the center of the web and use it as a lacy doily effect.  The back of these webs is white!  Spritz it with a little glitter and you will have a totally new accent piece.  I colored in the little vampire with blender pens and ink pads.  Check out his bright blue eyes and jeans peeking out from beneath his cape!    The original idea for this card was found on the internet, shared by Connie Babbert.  You can see her original card HERE.

Please leave me a comment to let me know you stopped by to visit!


Monday, October 12, 2015

Snow Place Snowman

This is one of the cards we made at the Christmas Card Sampler Class.  I got the basic idea for this snowman card from Page 33 in the Holiday Catalog.  I have seen several versions of this card CASE'd on the internet, but finally settled on this look for mine and I absolutely love it!  It's bright and cheery, slightly traditional but with a twist.  The stamp set I used is Snow Place on Page 33 in the Holiday Catalog, along with the matching dies.  The Designer Series Paper I stamped on is from the Season of Cheer package on page 29 in the Holiday Catalog.  Ovals Framelits gave my snowman a cute frame in which to sit.  Of course, a snow-themed card wouldn't be complete without a bit of glitter!  I used the new Fine Tip Glue Pen on Page 43 in the Holiday Catalog and Dazzling Diamonds Glitter to add a touch of shimmer to the center of each snowflake I stamped.

Please leave me a comment to let me know what you think.


Thursday, October 8, 2015

Witches' Night Happy Halloween

Here's a quick Halloween card made using the Witches' Night stamp set, Boho Chic Embossing Folder and the Spider Web Doilies.  It's an easy way to make a big impact!  There are several similar versions of this card on the internet.  I used the new Fine Tip Glue Pen to adhere the Spider Web Doily to the card front and it worked beautifully!

I look forward to your comments.


Monday, October 5, 2015

World Card Making Day Fun!

Here are a few images from the fun we had Saturday on World Card Making Day!  I think everyone had a wonderful time and took home some great projects.  Each stamper chose 2 of their projects to donate to a local assisted living facility, taking some time to give without expecting anything in return.

Halloween Dirt for a snack
and treat bags made from the Square Pillow Box Die
and Woodlands Embossing Folder.
All ready for the stampers.


Hard at work.
Helping a new stamper.

Halloween Dirt is delicious!

More projects.

Witches' Night

This is my truly elegant Halloween card.  The stamped images all come from Witches' Night stamp set.  Using our new Basic Black Archival Ink Pad works beautifully with these Photopolymer stamps, although I found the best way to get a really crisp image with these stamps was to ink the stamp, then placing the stamp face up on the table, put your cardstock on the stamp image and rub firmly with your hand.  It worked better than pressing the stamp down onto the cardstock, which often left me with little gaps or a blurred image from pressing too hard.

The paper used was Very Vanilla cardstock, Black Glimmer Paper, Gold Glimmer Paper, and Winter Wonderland Specialty Designer Series Paper.  I used the Lots of Labels Framelits Dies to cut out the main shapes, a 3/4" Circle Punch for the "31", and the 7/8" Scallop Circle Punch for the tiny bit of Gold Glimmer Paper that shows around it.  The crow was fussy cut out and popped up on a Dimensional.  I also used Dimensionals under the Gold Glimmer Paper that was cut out with the Lots of Labels Framelits.

The only ribbon accent is the Very Vanilla 1 1/4" Subtle Stripes Satin Ribbon.  It is oh so gorgeous and elegant!  I found the original idea for this card online, but the creator didn't label it with her watermark, so now I don't know exactly who first created it.  I did change it up a bit, though.

Please leave me your comments about this card.  I love to hear from you!


Thursday, October 1, 2015

Wonderland Trees

This is another of the cards we made at the Christmas Card Sampler Class last weekend.  It is a simple and lovely presentation of the stunning trees in the Wonderland stamp set on page 23 of the Holiday Catalog.  The trees were stamped directly on the Merry Moments Designer Series Paper found on page 27 of the Holiday Catalog.  This is a great Paper Stack for creating multiples of the same card.  You get 24 of 2 double-sided designs!  They each measure 6" x 6".  This card uses a 3" wide strip, so I can make two cards from each piece.  The sentiment is from Versatile Christmas on page 26 of the Holiday Catalog, the White Glitter Ribbon is on page 29, and the adorable button is from the Home for Christmas Designer Buttons collection on page 9.  I also used the new Fine-Tip Glue Pen on page 43 of the Holiday Catalog along with Dazzling Diamonds Glitter found on page 162 of the Annual Catalog to give the trees a little sparkle.  As you can see, almost all the supplies came from the Holiday Catalog.  There are so many wonderful items in that catalog--I just can't get enough of them!

Please leave me a comment and let me know what you think.


Monday, September 28, 2015

Every Blessing

This is one of the cards we made Saturday at the Christmas Card Sampler Class.  It is actually very simple to create, using the emboss resist technique to make the white sentiment and star show through.  The stamp set is Every Blessing on page 70 of the Annual Catalog.  The only ink you need for this is Night of Navy and Versamark.  White Embossing Powder is used for the sentiment and star.  One single Basic Rhinestone embellishes this lovely card.

I admit the idea for this card is not original.  I found it somewhere on the internet, but don't know the name of the original creator, as her name was not watermarked on the image.  So when I went back to look at the ideas I had saved, I had no way to return to the original website.

Please leave me a comment and let me know what you think of this card.


Thursday, September 24, 2015

Among The Branches

This is my very favorite Halloween card for this year!  It was all done with free-hand sponging, no torn masks.  I did use a mask for the moon, though.  The embossing folder is called Woodland and is on page 39 in the Holiday Catalog.  The stamped images are from Among the Branches Photopolymer stamp set, also found on page 39.  These two items can be purchased as a bundle and you save 15% that way!  The Black 3/8" Stitched Satin Ribbon is in the Annual Catalog on page 159.  To create a new shape for the greeting, I cut it out using the Circles Collection Framelits, then put it in my paper cutter and cut just above and below the sentiment.  I love the new shape it creates!

I was inspired to make this card from Michelle Zindorf, but really wanted to use the stamped image spooky from Among the Branches stamp set.  So this is my version.  You can see her original card here.


Monday, September 21, 2015

Christmas Card Sampler Class Sneak Peek

Here is a sneak peek into one of the cards we will be making at the Christmas Card Sampler Class on Saturday, September 26.  If you are in the O'Fallon area and would like to join us for the class, please contact me ASAP, as I will be cutting cardstock and assembling supplies soon.  Although official registration has closed, I will try to get you into the class if I have enough notice.  I have 6 different card projects planned to give you a creativity boost into the holiday season!  The projects will include different color schemes, techniques, and themes.


Thursday, September 17, 2015

Haunt Ya Later Card

This sweet little card is made with the  Haunt Ya Later stamp set on page 48 of the Holiday Catalog.  I also used the adorable Happy Haunting Designer Series Paper and the Spider Web Doilies, both of which can be found on page 47 of the Holiday Catalog.  Those Spider Web Doilies are just so fabulous they are already on backorder, but new shipments are coming in soon.  The back side is white, so you can create a whole new look for your projects.  You can even trim out the center part to make an entirely different look for a card that has nothing to do with spider webs or Halloween.  So place your order for some of these fun Halloween items soon!

What do you think of my sweet little trick or treater?


Monday, September 14, 2015

Haunt Ya Later Treat Bag

Here is a sweet little treat bag made with the Gift Bag Punch Board, Stampin' Write Markers and the Haunt Ya Later stamp set from the Holiday Catalog.  It was so quick and easy to assemble and I just put the sentiment and the cute little witch on the front of the bag with Dimensionals.  The bag is made from White Corrugated Paper on page 148 of the Annual Catalog and striped with a Pumpkin Pie Marker.  The ribbon to tie the bag shut is 1/8" Stitched Black Satin Ribbon on page 159 of the Annual Catalog.  The sentiment was punched out with the Large Oval Punch on page 165 of the Annual Catalog.

Please leave me a comment and let me know what you think of my little Halloween treat bag!


Upcoming Events!

My Christmas Card Sampler Class is scheduled for Saturday, September 26, 12-4 p.m.  A second class is available on Sunday, September 27, 1-5 p.m.  Make 6 different cards to inspire you for the upcoming holiday season!  Christmas refreshments served.  $15 class fee (waived with $30 order).  Check back soon for a sneak peek into a project or two!  Registration closes September 19.  Register by emailing me or through my website at www.stampinup.net/esuite/home/smilesacrossthemiles/events.

World Card Making Day Event is scheduled for Saturday, October 3, 12-4 p.m.  Join with papercrafters all over the world on this day!  In nearly every country someone will be making cards with you on the very same day.  Cool, huh?  Make a variety of cards--some to keep and some to donate.  The goal is to make someone smile!  Barbecue to follow card making.  $12 event fee (waived with $30 order), $3 additional for meal.  Registration closes September 26.  Register by emailing me or through my website at www.stampinup.net/esuite/home/smilesacrossthemiles/events.

Punch Art Class is scheduled for Friday October 23, 6:30-8:30 p.m.  Make 3 projects creating fun art with punched shapes.  $10 class fee (bring a friend and you each pay just $8)  Registration closes October 15.  Register by emailing me or through my website at www.stampinup.net/esuite/home/smilesacrossthemiles/events.

Thursday, September 10, 2015

HALF OFF PAPER PUMPKIN

TODAY IS THE DAY!

Today is the LAST DAY new subscribers can get HALF OFF their first 2 months of Paper Pumpkin!  Just use promo code HALFOFF when you subscribe!  Go directly to my Paper Pumpkin website HERE to sign up for 2 months of Paper Pumpkin at just $9.98/month.  You can cancel at any time but I'm certain you will be thrilled with all the wonderful projects, including instructions, delivered directly to your door every month.  Try it today!