~ inspire.create.share. ~ inspire.create.share. ~ inspire.create.share. ~ inspire.create.share. ~ inspire.create.share. ~ inspire.create.share. ~

Wednesday, September 7, 2016

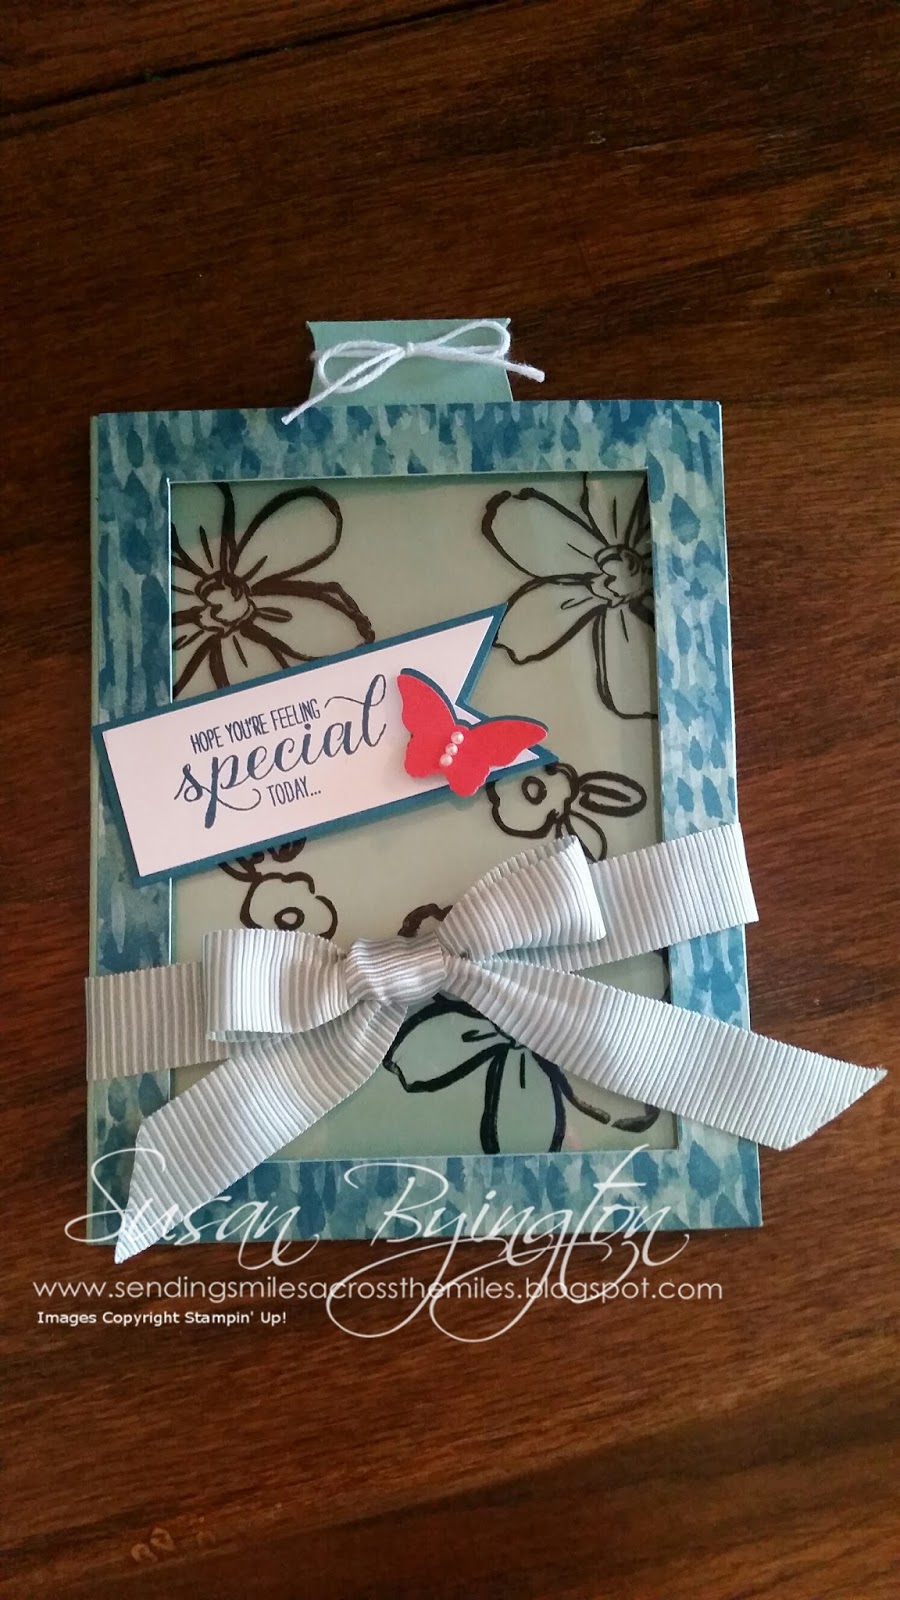
Magic Slider Card

Today's post shows you a magic slider card we made during one of our Saturday Skills Classes.  Magic is always fun and this card is no exception.  When closed the image appears to be a black outline on a Mint Macaron background.  When you pull the tab up to open, the image is in wonderful color and another sentiment appears!  I watched a couple different videos to learn how to make this card, then adapted them to suit how I wanted this card to work.  I didn't want the inside to come all the way out when the tab was pulled, so I created some stops near the top with Dimensionals and cut the slider part into a slightly inverted "T" so the top edges of the "T" would hit the Dimensionals and prevent it from sliding out all the way.  It worked although I feel it still needs some fine tuning.

The stamp set I used is Garden in Bloom and the papers are Mint Macaron, Island Indigo and Blooms & Bliss DSP.  I just love that Mint Macaron 5/8" Mini Striped Ribbon!  Everything is placed on a bit of an angle to create the whimsical feeling of this card.  The ribbon is even tied at an angle and secured in the back with a Glue Dot to keep it that way!

Here is the Stampin' Up! video I watched to learn how to create this card.  Magic Card by Stampin' Up!

Please leave me a comment and let me know what you think!

Note:  Stampin' Up! products are shown in bold.


Thursday, September 1, 2016

Holiday Catalog Now Live!


The Holiday Catalog that you have been anxiously awaiting is now live!  This catalog is filled with lots of products and ideas to make your holidays fun and festive.  Check it out today!  If you don't already have a Holiday Catalog and would like one, contact me today!  I will give you one of these catalogs free with an order of $10 or more.  If you simply want to purchase one, they are $1.00.  When you place your next order of $10 or more through me, $1.00 will be deducted from your total!

Thursday, August 25, 2016

Beautiful Branches

Here are a couple more cards made with the Thoughtful Branches Bundle.  I made one a thank you and the other one a lovely sympathy card.  The layer of Designer Series Paper is from By the Shore DSP.  You would never know from the picture in the catalog that these beautiful papers were included!  I absolutely LOVE them!

The thank you sentiment is from Thoughtful Branches and I'm not quite sure where the sympathy one came from.  It might be from a retired set.  My craft room is a bit of a disaster right now and I can't find the set I used!  The inside was the same piece of DSP and I stamped the sentiment directly on the paper for a lovely effect.

Please leave me your comments below.

*Items in bold are Stampin' Up! products.


Tuesday, August 23, 2016

Thoughtful Branches Bundle

The Thoughtful Branches Bundle is a hit sensation with images popping up all over the internet!  Here is another image to share.  This is one of the cards we made at Stamp Club this month.  It is so very clean and simple, but has quite an impact!  I'd definitely call it a WOW card.  I used the Thoughtful Branches stamp set for the sentiment and the Beautiful Branches Thinlits to cut out this lovely tree.

In this card you see positive and negative images used together to create the dramatic tree image.  The new Foam Adhesive Strips were used around the tree to pop up the Very Vanilla layer.  These strips are a little thicker than our regular Dimensionals, and that gave it just enough depth to really see the contrast.

I was inspired by Kylie Bertucci's card.  You can see her original card here.  As you can see, I made a couple subtle changes when creating my card.  I used Early Espresso, Cajun Craze, and Very Vanilla cardstock for my card; and added a lovely soft touch with Mint Macaron 3/8" Sheer Linen Ribbon and 1/4" Gold Natural Trim.

Please leave me a comment and let me know what you think!

*Words in bold are Stampin' Up! products.


Thursday, August 11, 2016

Baseball Birthday--Go Cards!

Here's a fun birthday card for a baseball fan!  I used a retired punch for the arrows and a circle punch (sorry don't recall what size) for the baseball with hand-drawn stitching.  Place a punched circle on the ball and use a red Sharpie to draw around the outline and carefully add the stitch arrows.  Then I pierced a hole at the end of each "stitch" for a bit of realism.  The Kraft cardstock for the "dirt" was crumbled up multiple times and sponged with Soft Suede ink.  The sentiment is from Thoughtful Banners and the matching Duet Banner Punch was used to punch it out.  I also pierced the edges of the "dirt" all the way around, but it's a bit hard to see in the photo.

I was inspired by Breelin Renwick for this card.  You can see her original card here. 

Please leave me a comment and let me know what you think of my baseball birthday card.  Being a St. Louis Cardinals fan, of course, red is the primary focus on this card!


Monday, August 8, 2016

Seaside Shore Fancy Flap Card Fold

Oh the fun things that come to mind when you think summer, sand and sea!  I love the sea and everything about it!  This card makes you feel like you are taking a dip right in there with the fish.  To create this card I used the Seaside Shore stamp set and that wonderful photo realistic Serene Scenery DSP Stack.

This delightful card idea was CASED from Debbie Henderson and you can see her original card and directions here.  Note:  When stamping your sea plants and inside sentiment, check the placement of your circle cuts first, as I had to re-do mine because they showed in the center circle when the card was closed.  Using your Stamp-A-Ma-Jig is really helpful so you can be sure the plants look just right.  Also measure from the top center (2 1/8") to the side center (2 3/4") when making your cut on the first flap.  Don't cut from the side center to the top fold as I first did.  Her directions tell you to cut from the fold line to the side center, but that is an error.

A delightful bonus was that the back of the DSP had a pattern that I thought looked like sand dollars, so I left that visible when the card was fully opened.

I used the Gold Wink of Stella to color in my sea plants and I think the look is fabulous!  It's a kind of greenish gold with the DSP background.  The Happy Birthday sentiment is from Thoughtful Banners and punched out with the matching Duet Banner Punch.

I sponged the edges of the torn cardstock for the sand and did a little extra tapping of ink with the sponge on the front to give it more texture.  I believe I added this texture after I photographed it.  Don't glue the top of the torn edges down so you can slip in your shells and starfish.  I also added a little shimmer to the starfish, shells and fish fins with Clear Wink of Stella.

I am so thrilled with how this card turned out!  It takes a little extra love and some fussy cutting, but for a special recipient, it is well worth it!  This one went to my niece for her birthday.  I hope you enjoy it and will try to make one of your own.  Please leave me a comment below.

Note:  Words in bold are Stampin' Up! supplies used.


Saturday, August 6, 2016

Thoughtful Branches Bundle

The Thoughtful Branches Bundle is now available but only until August 31st, so place your order soon!  This is one card I made with the bundle and I used the sentiments from Here for You.  There are some great sentiments in that set that are on the more casual side.  Sometimes that is just the perfect message you want to convey with a card!

Here I wanted to send a little "pick me up" message and I thought the tree with the lone apple did the trick.  I loved that there was a matching die to cut out my little apple, too!  I could have fussed more and added extra details, but the card was for a man, so I figured simple was better.

I CASED this idea from a card made by Susan Itell.  You can see her original card here.

What do you think of this lovely set?  We will be using this set on Friday for Stamp Club this month to make a couple more cards with totally different looks.  Check back to see them soon!